
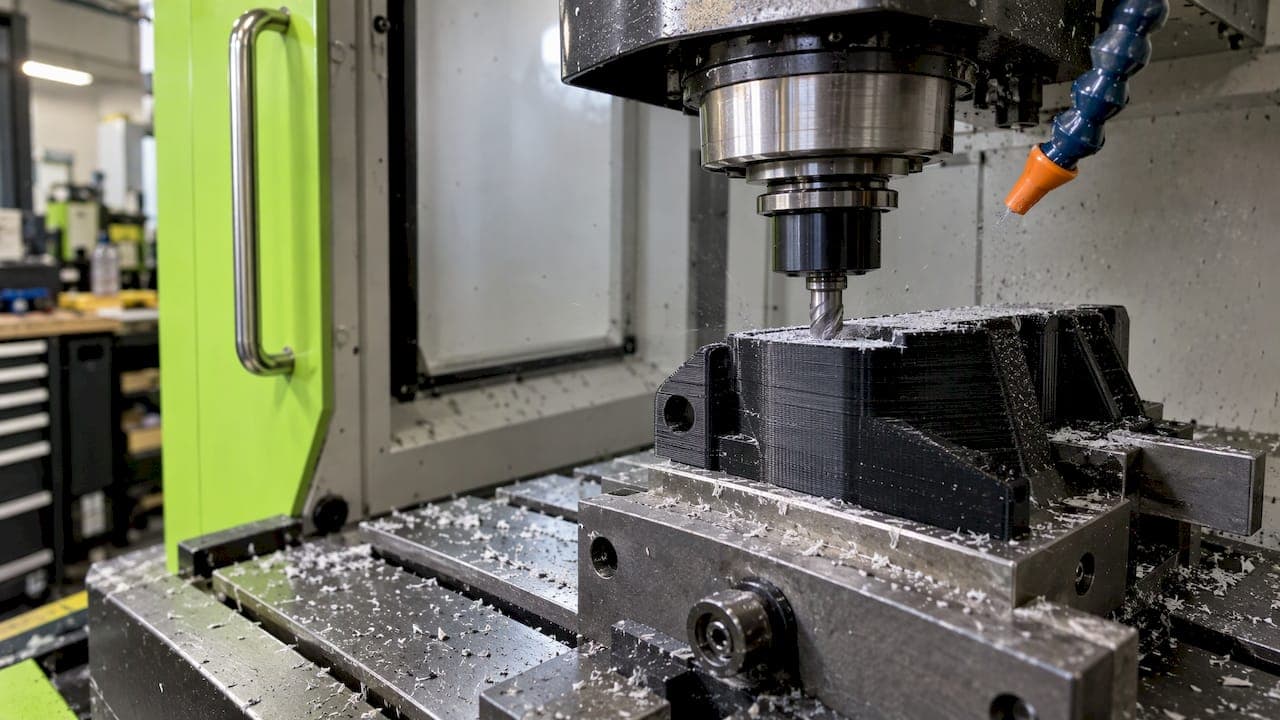
You can machine most 3D printed parts, and it is worth doing when a surface has to fit, seal, slide, thread or carry load. Plastic prints take drilling, milling and tapping if you go gently. Printed metal usually needs machined datum faces, bores and threads before it goes into an assembly. If the printed part is only a stand-in for the real thing, the better move is often to machine the final part directly.
This guide covers when machining a print is the right call, how materials differ, how to prepare and hold the part, and where we see printing and CNC work best together.
TL;DR
- Machine a printed part when the surface affects friction, sealing, fatigue, fit or assembly. Leave everything else as printed.
- Print near-net shape with extra stock on the faces you will cut, then clamp the part securely and take shallow cuts.
- Plastics need sharp tools, air or light cooling, pilot holes and care with layer direction. Resin and metal prints each have their own rules.
- Printing is a fast way to prove a shape. Once the design is settled, machining the final part from solid stock can be the shorter path to something durable.
- Send us your drawing or model if you want a machinist's opinion on the next step.
When machining a printed part makes sense
Printing gives you geometry that is hard to cut: internal channels, lattices, organic shapes. It does not give you flat datum faces, round bores and clean threads without help. That is where machining earns its place.
One hybrid manufacturing overview says CNC finishing is warranted when the printed surface affects friction, sealability, fatigue, cleanliness, fit or assembly. The same article describes hybrid manufacturing as a good match for complex geometry, expensive materials, low volume, critical repairs, long lead times, obsolete parts and functional surfaces that need CNC finishing.
In practice, you machine a printed part for reasons like these:
- A bore must accept a bearing, bushing or dowel. Printed holes tend to come out slightly off size and slightly out of round. A reamed or bored hole fixes that.
- Two parts must mate on a flat face. Printed faces carry layer lines and slight warp. A faced surface gives you a true seat.
- A thread has to survive repeated use. Cutting a thread in a machined feature is more dependable than relying on a printed one.
- The part needs a smoother finish for appearance, wear or sealing.
- Support marks or sacrificial pads need to come off cleanly.
The flip side: if a printed face never touches anything, machining it adds cost and no value.
Which printed materials machine well
Most printed plastics can be machined, fastened or joined. Formlabs notes in its 3D printing guide that printing is often an intermediate step toward conventional methods, for example making molds or patterns for casting. That same mindset applies to machining: the print is a blank, and you finish it.
FDM filament parts
FDM parts are layered thermoplastic. They cut like plastic, but with a grain. Tough engineering polymers such as polycarbonate and ULTEM tend to machine more cleanly than soft ones. ABS and ASA can turn gummy when drilled, so they reward slower cutting and light passes. If you are weighing high-performance polymers for a finished part, our comparison of PEEK vs Ultem walks through the trade-offs.
Two things drive most FDM trouble:
- Layer direction. A hole drilled along the layers (horizontal) can split between them. A hole drilled across them (vertical) is far safer.
- Heat. Plastic that gets hot smears, melts onto the cutter and tears out. Sharp tools, light cuts and chip clearance keep it cool.
Resin (SLA and similar) parts
Resin parts are generally more brittle and vary a lot by formulation. In a Formlabs engineering white paper, Tough 2000, Tough 1500 and Durable resins are the ones that withstand machining best. Other resins call for more conservative technique and faster tool speeds. If you plan to machine a resin print, pick the tougher grades from the start.
Metal printed parts
Printed metal is a different job. These parts often arrive with rough surfaces, support stubs and residual stress, and the features that matter in assembly are usually the ones that need cutting. The hybrid manufacturing article above frames this as a standard pairing: print the complex shape, machine the functional surfaces. Hard alloys call for rigid setups and proper tooling, so this is shop work rather than a garage job.
Prepare the part before it ever reaches the machine
Most failures happen before the first cut. Three decisions matter.
Print near-net with stock where you will cut
Design the print slightly oversize on every face, hole and boss you plan to machine. A part printed to final dimension leaves nothing to remove, so any warp or layer waviness stays in the finished piece. Extra material at cut surfaces gives the tool something to clean up.
For holes, print them undersized and finish them with a drill, reamer or boring bar. That gives you a round, correctly sized hole and keeps the position set by the CAD rather than by the printer's shrinkage.
Tell the machinist what the part is
A print is not a drawing. Give the shop:
- the final-state CAD model, with the printed blank shown separately if you have it;
- the print orientation, so the machinist knows where the layers run;
- which faces carry retained stock and which are the datums;
- tolerances and surface finish only on the features that need them.
A clean print is a good start. For help on what belongs on it, see our guide to CNC drawing standards.
Hold the part without crushing it
Plastic prints flex and crack under hard clamping. Use soft jaws, a fixture that supports the part across a broad area, or a custom nest shaped to the print. Mitsubishi Chemical's guide to machining plastic parts recommends enough fixturing to allow fast table travel and high spindle speeds without over-tightening. A fixture is often a small CNC job in its own right, and it is one reason a shop that makes fixtures, brackets and support parts can save you trouble on a one-off.

Also machine the features that set assembly fit first: mounting pads, locating bores, sealing lands, bearing seats, threaded ports. Everything else can be finished after those are right.
Drilling, milling and tapping printed plastic
The rules are the same ones good machinists use on any plastic, with extra care for layers.
Drilling
- Start with a pilot hole, then step up through two or more bit sizes for larger holes.
- Use sharp bits at modest speed and take nibble or peck cuts so chips clear and the plastic does not heat up. The Mitsubishi guide recommends peck drilling with slow-spiral drills for small holes to improve swarf removal.
- Put a hard backing board behind the part so the bit does not blow out the exit side.
- Orient holes across the layers where you can.
Milling
- Climb milling is the preferred direction for plastics, according to the same guide, and positive-geometry cutter bodies are recommended for face milling.
- Take shallow passes. Printed parts have internal voids and sparse infill, so a heavy cut can crack a wall.
- Keep tools sharp. A dull cutter rubs and melts instead of cutting.
Cooling
- For FDM plastics, a stream of air generally works better than flood coolant, since liquid can be absorbed into porous prints and make a mess of the surface.
Threads
- For a screw that will be removed often, tap the hole in machined material or use a threaded insert. Printed threads wear quickly.
A practical test before you commit: machine a scrap print made with the same material, orientation and infill. It costs a few minutes and tells you how the layers will behave.
What machining changes on a printed part
The usual reasons to machine are tighter dimensions and a smoother finish. Printing processes differ widely in how accurate and smooth they are, and machining is the way to bring critical features into a tighter range. Rather than quoting a single number for all printers, set your tolerance by function. A bearing seat and a cosmetic cover do not need the same treatment.
A useful way to plan it:
| Feature | Leave as printed | Machine it |
|---|---|---|
| Cosmetic outer faces | Usually | Only if finish matters |
| Mating flat faces | Rarely | Yes |
| Bearing and bushing bores | No | Yes, drill and ream or bore |
| Threads that see repeat use | No | Yes, tap or insert |
| Internal channels and lattices | Yes | Not reachable anyway |
| Support contact areas | No | Remove and clean up |
Machine only what the function demands. Every machined face adds setup time, and setup time is what drives cost on small jobs. If you want a way to sanity check what a quote should look like, our notes on CNC machining cost and CNC prototyping cost show how shops build up a price.
When to skip the print and machine the final part
Printing is great for proving a shape. It is not always the right way to make the part you will actually use. Ask yourself:
- Will the part see impact, vibration or repeated load? Layered plastic can fail along its layers. A part machined from solid stock has no layer lines to split along.
- Do you need more than a handful? Short runs favor machining once the setup is done. Our short-run CNC production guide explains how small batches are planned.
- Will the part be exposed to the elements? Outdoor use, heat and abrasion are hard on printed plastics.
- Is the geometry actually machinable? If it is a simple bracket, plate or housing, you gain little by printing it first.
The best workflow is often: print to check fit and ergonomics, revise, then machine a production-intent version. Our write-up on rapid CNC prototyping covers how fast that second step can be, and the prototype-to-production process for motorcycle parts shows it on real parts.
Our perspective
We make motorcycle parts and we machine parts for customers in Athens, Alabama, so we see both sides of this question. A printed part is a great way to find out whether an idea works. A bracket, a mount or a stand printed in an afternoon tells you about clearance, reach and feel before you commit to metal.
What a print cannot tell you is how the part will live. Our E2 Kickstand is a good example of why we machine rather than print. A kickstand takes weight, vibration and the occasional kick from a kid in a hurry, and we designed it as a CNC-machined part for that reason. The shape started as a design problem, and the answer was durable construction, not a clever print.
Because the same shop designs, machines and ships everything, and you talk straight to the machinist, a revision is a conversation, not a ticket. If you have a printed prototype that works, bring it. We can help you decide which features to machine, and whether the final part should be machined from solid stock instead.
Drake
Work with a machinist who also designs
If you are holding a printed prototype and wondering what comes next, we can help from first part to short run. We do prototype machining, short-run production, and fixtures, brackets and support parts, and you deal directly with the machinist who will cut your job. Send us your drawing or model through our shop for a quote.
If you ride, our bolt-on E2 Kickstand for the KTM SX-E 2, GASGAS MC-E 2 and Husqvarna EE 2 electric mini bikes is CNC-machined in our shop and priced at $100–$105. It is a replacement for the factory triangle stand, built for riders who want something sturdier.
A short checklist before you send a printed part to a shop
- Confirm the material and process (FDM, resin or metal) and note the exact filament or resin grade.
- Mark the features that must be machined and the ones that stay as printed.
- Note the print orientation and where supports touched the part.
- Leave stock on the cut faces and print holes undersized.
- Share the final CAD and, if you can, the as-printed model.
- Say how many you need now and later. A one-off and a run of fifty are planned differently. The questions engineers should ask a machine shop are a good list to have in front of you when you talk.
FAQ
Can you CNC machine a 3D printed part?
Yes. Most printed plastics and metals can be drilled, milled, turned or tapped. Plastic prints need sharp tools, light cuts and gentle clamping, and metal prints usually need a rigid setup. Machine the functional features and leave the rest as printed.
Is it better to 3D print a part or machine it?
It depends on geometry, quantity and use. Printing suits complex shapes and quick concept checks. Machining suits parts that need tight fits, smooth surfaces or strength under load. Many projects use both: print to prove the design, then machine the production version.
How do I drill a hole in a 3D printed plastic part?
Start with a small pilot hole and step up in size. Use a sharp bit at a modest speed, peck so chips clear, and back the part with a hard board to prevent breakout. Drill across the layers where possible, because holes along the layers can split the part.
Do I need coolant when machining printed plastic?
For FDM plastics, an air blast is the usual choice because it clears chips without soaking a porous print. Keep tools sharp and cuts light so the plastic does not heat up and smear.
Which resin prints machine best?
Tougher engineering resins hold up best. In one Formlabs white paper, Tough 2000, Tough 1500 and Durable resins withstand machining better than the rest of the range, which need more conservative technique.
Sources
- Hybrid manufacturing: CNC and 3D printing for critical parts (Inspenet)
- 3D Printing Guide (Formlabs)
- Engineering Fit white paper (Formlabs)
- Guide to machining plastic parts (Mitsubishi Chemical)