
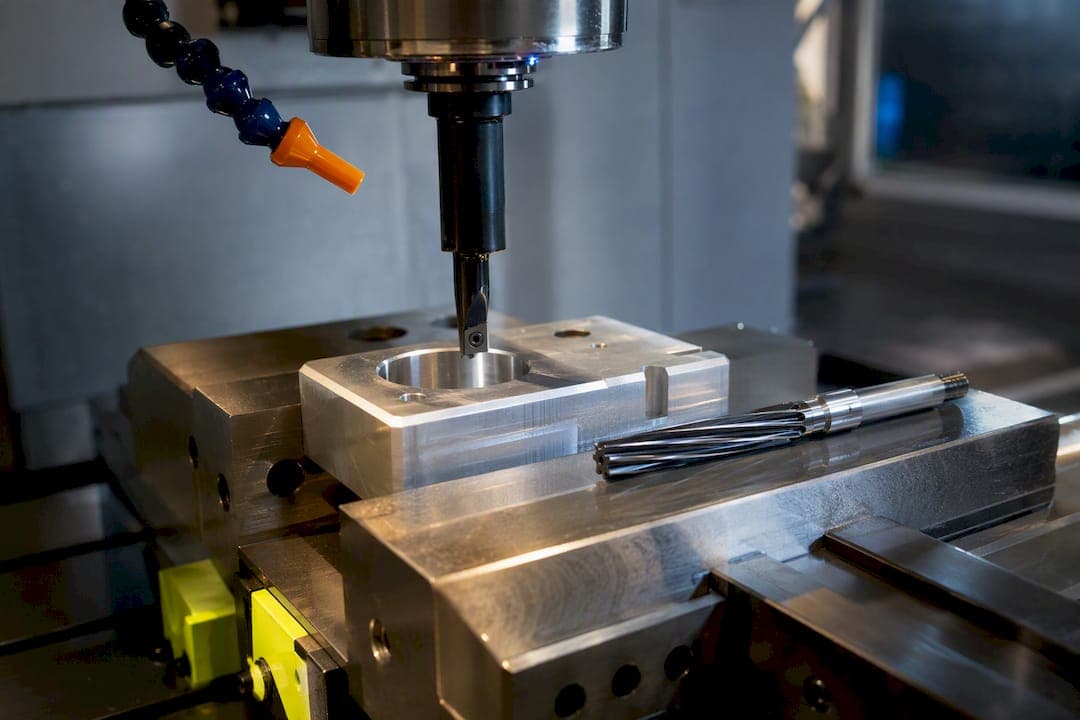
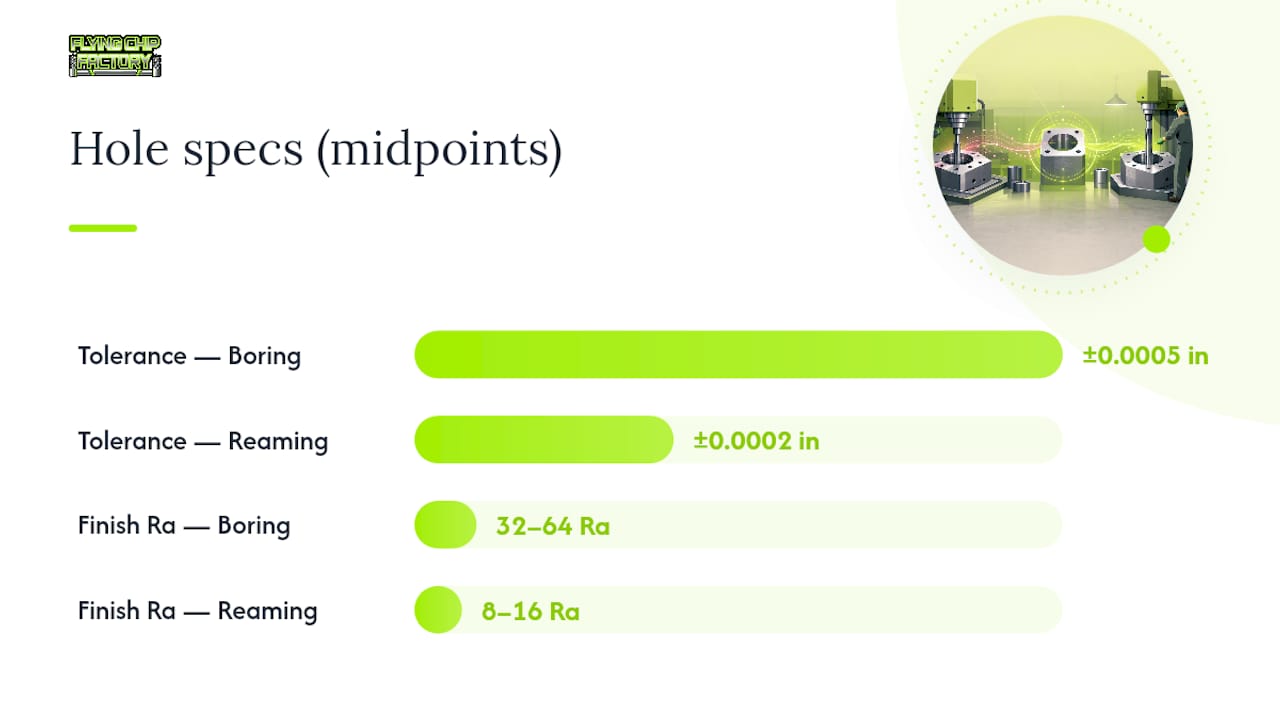
Boring establishes or corrects hole location and geometry; reaming is a finishing operation that delivers tighter diameter tolerances and a smoother surface. Boring typically holds around ±0.0005 inches, while reaming tightens that to roughly ±0.0002 inches with a finish near 8 to 16 Ra. Most precision workflows use both: bore first to fix location, then ream to hit final size and finish.
TL;DR:
- Boring can reposition large or misaligned holes and is suitable for interrupted cuts, while reaming focuses on finishing and fine-tuning the size of already aligned holes.
- Boring typically achieves tolerances near ±0.0005 inches with a surface finish of 32 to 64 Ra, whereas reaming can reach ±0.0002 inches with a finish around 8 to 16 Ra.
- For holes requiring both positional accuracy and a tight diameter, boring should precede reaming in the workflow to avoid issues like out-of-roundness and poor surface finish.
- Correct coolant strategy and toolholder precision are critical in reaming, especially for blind holes and high-volume production, to prevent chip packing and finish degradation.
- Skipping boring and directly reaming a misaligned or poorly prepared hole risks excessive tool wear, poor surface finish, and part rejection.
What Is Boring in Machining?
Boring is a single-point cutting process that enlarges an existing hole using a boring bar or boring head mounted in a lathe, mill, or CNC machining center. Unlike drilling, which creates a hole from solid stock, boring refines one that already exists, correcting its position, straightness, and roundness along the way.
That correction ability is what separates boring from every other holemaking method: a boring bar can be nudged to walk the hole back onto true center. Reamers cannot do this. That single fact drives most of the tool-selection decisions covered later in this guide.
Shops reach for boring when:
- The hole needs to be repositioned, not just enlarged.
- The diameter is large enough that a standard reamer isn't practical or cost-effective.
- The cut is interrupted (castings, weldments, cored holes) where a multi-flute tool would chatter.
- Prototype or short-run work makes a dedicated reamer uneconomical.
Boring routinely holds tolerances around ±0.0005 inches, which is tight enough for most fits, but its as-cut surface finish runs coarser, typically in the 32 to 64 Ra range; for brittle materials like glass, special CNC glass machining techniques ensure precision without damage. Boring bars also wear differently than fixed-geometry reamers, so dimensional drift over a long run needs closer monitoring than a reaming operation would.
What Is Reaming and How Do Reamers Cut?
Reaming is a multi-flute finishing operation that sizes and polishes a hole a previous step already roughed close to final dimension. A reamer does not cut its own path. It follows the bore that drilling or boring already created, which means it cannot fix a hole that's off-center or crooked.
That "follows the hole" behavior is the core limitation every machinist needs to internalize. Forcing a reamer to correct positional error causes chatter, bell-mouthing, and premature tool wear rather than a straighter hole.
What reaming does deliver is precision sizing and a burnished finish. Typical multi-flute reamers achieve:
- Diameter tolerances down to about ±0.0002 inches.
- Surface finishes generally range in single-digit Ra to low double-digit Ra, smoother than most boring operations produce.
- Common styles including chucking reamers, shell reamers, and coolant-fed carbide reamers for production runs.
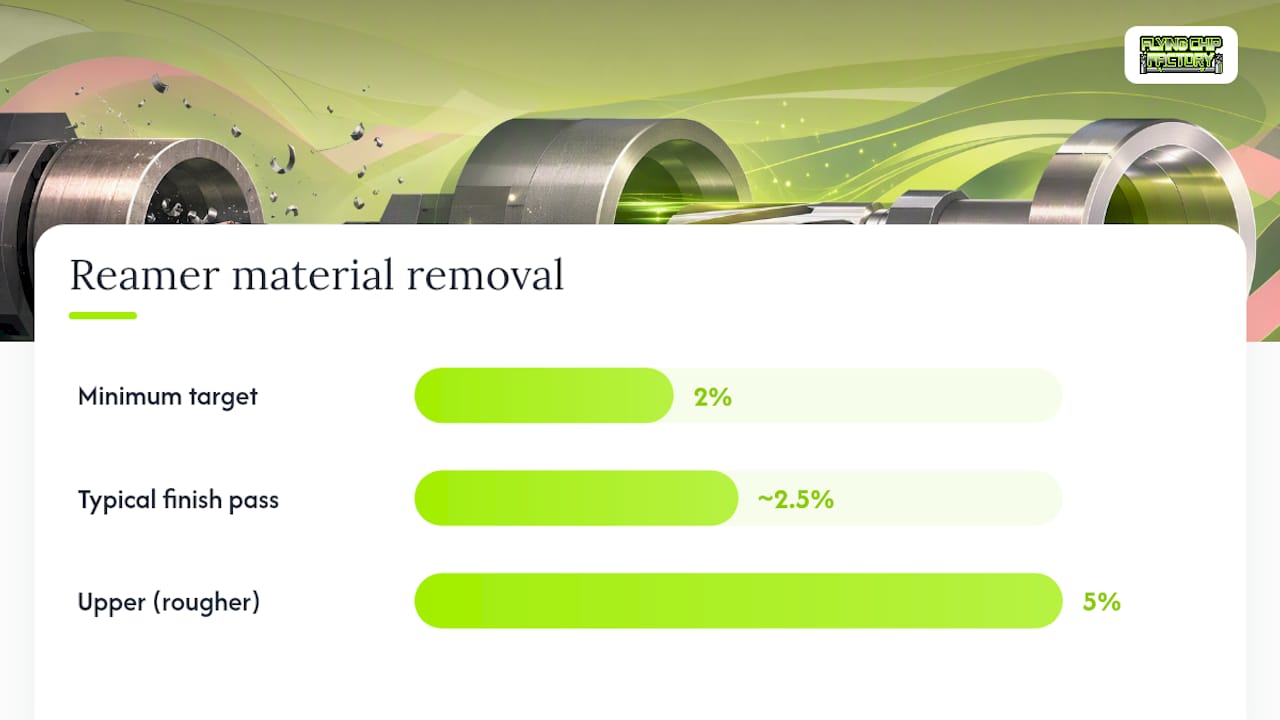
Reamers are stock-sensitive tools. Removing too much material overloads the flutes and burns the finish; removing too little leaves the hole undersized. The accepted target is about 2% to 3% of reamer diameter for finish reaming, with up to 5% acceptable for rougher passes depending on material. Blind holes add another wrinkle: chips have nowhere to go but back up the flutes, so coolant delivery and pecking strategy matter more than on a through-hole.
Reaming vs Boring: A Direct Comparison
Once you line up the two methods side by side, the decision usually clarifies fast. Boring corrects; reaming finishes. Neither substitutes for the other once tolerances tighten past a few thousandths.
| Factor | Boring | Reaming |
|---|---|---|
| Purpose/role | Corrects location, geometry, straightness | Sizes and finishes an existing, aligned hole |
| Typical tolerance | ±0.0005 inches | ±0.0002 inches |
| Surface finish (Ra) | 32 to 64 Ra | 8 to 16 Ra |
| Material sensitivity/chips | Handles interrupted cuts, castings well | Sensitive to stock allowance and chip evacuation |
| Typical tooling | Single-point boring bar/head | Multi-flute reamer (chucking, shell, coolant-fed) |
| Best-for/production context | Low-volume, prototyping, positional correction | High-volume, consistent finish, stable upstream process |
The numbers come from Industrial Monitor Direct's tolerance guide, and they hold up across most shop-floor experience: boring gives you flexibility, reaming gives you repeatability.
A few things worth underlining beyond the table:
- A reamer run against a hole that's out of position doesn't fix it. It follows it, chatter included.
- Boring can be dialed in mid-run on a CNC lathe or mill; a reamer's geometry is fixed once it's cut.
- Modern Machine Shop frames the real decision as one of constraints, not superiority: boring wins on flexibility for low-volume or complex parts, reaming wins on throughput once the upstream process is stable.
Specifying Tolerances and Surface Finish on Drawings
Getting the callout right on a drawing saves a shop from guessing which operation to run. If a print calls for a true position tolerance or asks the bore to correct an off-center pilot hole, that's a boring operation, full stop. Reaming can't touch positional error.
| Spec type | Boring | Reaming |
|---|---|---|
| Diameter tolerance | ±0.0005 in typical | ±0.0002 in typical |
| Surface finish | 32 to 64 Ra | 8 to 16 Ra |
| Geometric control | Corrects position/straightness | None (follows existing bore) |
Pro Tip: If your drawing specifies a positional tolerance tighter than ±0.001 inches on a hole that also needs a fine finish, don't ask a reamer to do both jobs. Bore to establish position first, then ream. Trying to skip the boring step is the single most common reason a "simple" reamed hole comes back out of round.
Inspection matters as much as the cut itself. Bore diameters get checked with calibrated bore gauges or air gauging for high-volume work; surface finish gets verified with a profilometer reading in Ra, not by eye or feel. For holes that also carry a true-position callout, a coordinate measuring machine is the only reliable way to confirm the boring operation actually landed where the print says it should. Our own breakdown of dowel pin hole tolerances walks through exactly how tight these calls need to be for press-fit and locating applications.
Speeds, Feeds, Toolholding, and Coolant Strategy
Reaming rewards a slower, heavier cut than most machinists expect. Kennametal's guidance puts reaming speed at roughly two-thirds of drilling speed for the same material, with feed rates run 200% to 300% higher than a drill would use. Running a reamer too fast or too light causes it to rub instead of cut, which burns the finish and shortens tool life fast.
Toolholding discipline matters just as much as the numbers. A few rules worth locking in:
- Verify spindle and toolholder runout under 0.00005 inches TIR before attempting ten-thousandth-level tolerances.
- Use shrink-fit or hydraulic holders for precision reaming; a standard drill chuck introduces too much runout.
- Reach for a floating or self-aligning holder when the setup can't guarantee perfect alignment between spindle and hole.
Coolant delivery changes with hole type. Axial, center-fed coolant is essential on blind holes since chips have nowhere else to escape; flute-fed or flood coolant works fine on through-holes where chips flush out the far end. Straight-flute reamers tend to suit through-holes, while spiral flutes handle blind-hole chip evacuation better, a distinction Kennametal also flags as a common source of finish problems when ignored.
Choosing Boring, Reaming, or Both: A Shop Workflow
Run through five questions before picking an operation: What diameter and tolerance does the print call for? What surface finish? What's the production volume? Is the cut interrupted? How skilled is the operator running it?
For holes that demand both tight position and tight diameter, the standard shop sequence looks like this:
- Drill or rough-bore close to final size, leaving controlled stock.
- Bore to about 1% under the low limit to establish true location and straightness.
- Ream to final diameter and finish, removing roughly 2% to 3% of reamer diameter.
- Verify with a calibrated bore gauge or CMM depending on the tolerance called out.
This sequence is exactly how dowel pin holes and bearing bores get made in most precision shops. Very large diameters skip reaming entirely since reamers that size aren't practical; very small bores sometimes skip boring if a drilled hole is already straight enough to finish-ream directly.
Common Mistakes and Shop Notes From Flying Chip Factory
The most frequent reaming failure isn't a bad reamer. It's insufficient pre-ream stock, which overloads the flutes, or excess runout in the holder, which turns a round hole oval. Wrong coolant delivery on blind holes ranks third, packing chips back into the flutes and tearing the finish.
For production runs, keep a backup reamer staged and inspect at a fixed interval rather than waiting for a part to fail gauge check. Flying Chip Factory runs this exact bore-then-ream sequence on our own CNC work in Athens, Alabama, including the tight tolerances that hold our E2 kickstand mounting bores square to spec across every production batch.
The Shop Perspective on Boring vs Reaming Tradeoffs
We default to boring first whenever a hole's location matters more than its finish, then bring in a reamer only once that position is locked. Skipping straight to reaming on an unproven bore is the fastest way to waste a finish reamer on a hole that was never straight to begin with. If your prototype or short-run part has a bore giving you trouble, reach out to Flying Chip Factory and we'll talk through the sequence with you directly.
— Drake
Sources
- Boring Bar vs Reamer: ±0.0005" Tolerance Machining Guide
- Reaming tool basics and tips - Kennametal
- Solving holemaking issues: Boring or reaming? - Modern Machine Shop
- Cost-effective reaming guide - Hannibal Carbide
FAQ
What Are the Disadvantages of Reaming?
Reamers can't correct hole location, they need precise pre-ream stock allowance to avoid burning the finish, and blind holes require careful coolant strategy to prevent chip packing that scars the bore.
Can You Ream a Hole With a Drill?
No. A standard twist drill lacks the multi-flute geometry and rigidity to size and finish a hole the way a reamer does; drilling roughs the hole, reaming finishes it.
What Does "Boring" Mean in Machining?
Boring is single-point machining that enlarges an existing hole while correcting its location, straightness, and roundness, typically holding tolerances around ±0.0005 inches.
What Is the Point of Reaming?
Reaming exists to size a hole precisely and leave a smooth, burnished finish, usually tightening tolerance to around ±0.0002 inches with an Ra of 8 to 16 after a prior operation has already set the hole's position.