
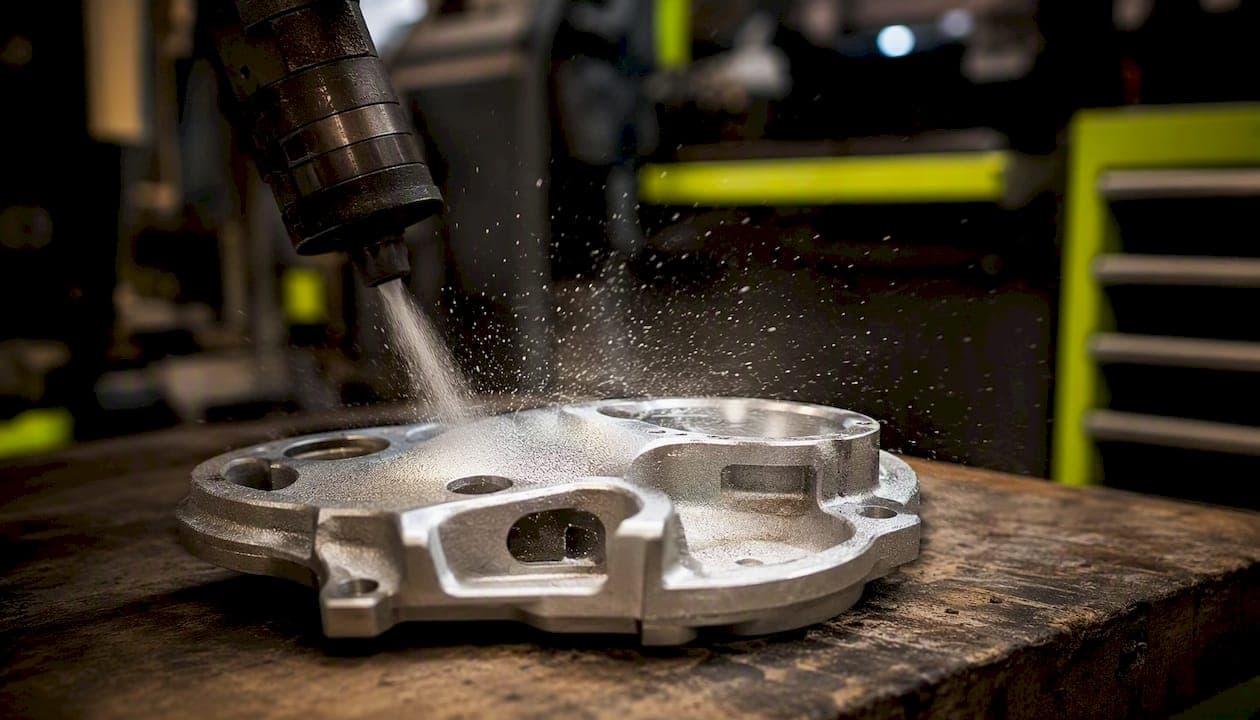
Bead blasting is the right call for cosmetic and precision-machined parts. Sand or grit blasting is the right call when you need to strip rust, mill scale, or old coatings and leave a surface ready to bond. The distinction comes down to media shape: spherical media peens, angular media cuts. Get that wrong and you either ruin a tolerance or waste time on a finish that won't hold a coating.
Quick job-mapped verdict:
- Cosmetic aluminum housings, anodize prep, or medical device finishing: use glass bead at low pressure.
- Rust removal, mill scale, or powder coat prep on steel: use aluminum oxide, garnet, or silicon carbide.
- Stainless steel parts where corrosion resistance matters: use glass bead or garnet only — never steel shot.
- Soft alloys or thin stamped sheet: bead blast at reduced PSI, or consider soda/walnut shell for the gentlest pass.
- Structural weldments going to paint: aggressive grit blasting is faster and gives the anchor profile coatings need.
Critical constraints to flag before you start: substrate hardness, dimensional tolerance on mating features, and whether the coating spec calls for a specific anchor profile depth. Those three factors narrow your media choice faster than anything else.
Key Takeaways
Bead blasting preserves tolerances and produces a cosmetic satin finish; grit blasting removes material aggressively and creates the anchor profile coatings need to bond.
| Point | Details |
|---|---|
| Media shape drives the outcome | Spherical media peens (bead blast); angular media cuts (grit blast). Match shape to your finish goal first. |
| Tolerance risk is real | Bead blasting removes less than 0.0001 in.; grit blasting can remove 0.001–0.003+ in. on sensitive features. |
| Silica sand is off the table | OSHA silica rules make silica-free alternatives (aluminum oxide, glass bead, garnet) the standard for compliant shops. |
| Masking drives per-part cost | Masking and handling account for 30–50% of job cost — send marked drawings to cut rework and labor. |
| Test coupons prevent scrap | Always run a test coupon on a new material, finish spec, or media before committing a production run. |
Need a shop that coordinates finish specs at the drawing stage? Flying Chip Factory quotes precision bead finishing and aggressive prep work with direct machinist communication.
How does bead blasting work, and what does it do to a surface?
Bead blasting propels spherical media, typically glass bead or ceramic bead, at a surface under compressed air. The spheres don't cut — they peen. Each impact creates a tiny compressive dimple, leaving the surface with a uniform satin texture and, in some cases, a slight compressive stress layer that can improve fatigue resistance on aluminum and titanium parts.
Material removal is close to zero. Bead blasting commonly removes a very minimal amount of material. on a machined surface, which means tight tolerances survive the process intact. That's why it's the standard choice before anodizing, where the surface needs to be clean and uniform without losing any stock.
Common bead media and typical specs:
- Glass bead: Mohs hardness ~5.5–6.0, spherical, available in mesh sizes from 40 to 325. Produces Ra ~0.8–1.6 µm. Reusable for many cycles before breakdown.
- Ceramic bead: harder than glass (~Mohs 7.0), longer service life, similar peening action, preferred for high-volume aerospace finishing.
Typical operating ranges for bead blasting run 40–80 PSI in a pressure cabinet, with CFM demand scaling to nozzle diameter (a ¼-inch nozzle at 80 PSI pulls roughly 50–60 CFM). Staying at the lower end of that pressure range is what keeps you from warping thin sections or rounding sharp edges on precision parts.
The finish looks matte-satin, slightly dimpled under magnification, and consistent across the whole surface. Spherical media peens and is preferred when preserving dimensions or achieving a satin finish — a point that matters enormously when a part has a tight fit or a cosmetic spec.
What is sandblasting, and how does it differ mechanically?
"Sandblasting" is the common name, but actual silica sand is rarely used in modern shops. The term now covers any process that propels angular abrasive media at a surface to cut, etch, or profile it. The angular shape is the key difference: instead of peening, each particle acts like a tiny cutting edge that removes material and leaves a rough, jagged anchor profile.
Bead blasting peens surfaces to a satin finish with near-zero material removal, while sand/grit blasting uses angular abrasives to cut the surface and leave an anchor profile — that anchor profile is exactly what powder coat, epoxy, and thermal spray coatings need to bond properly.
Common abrasives in modern practice:
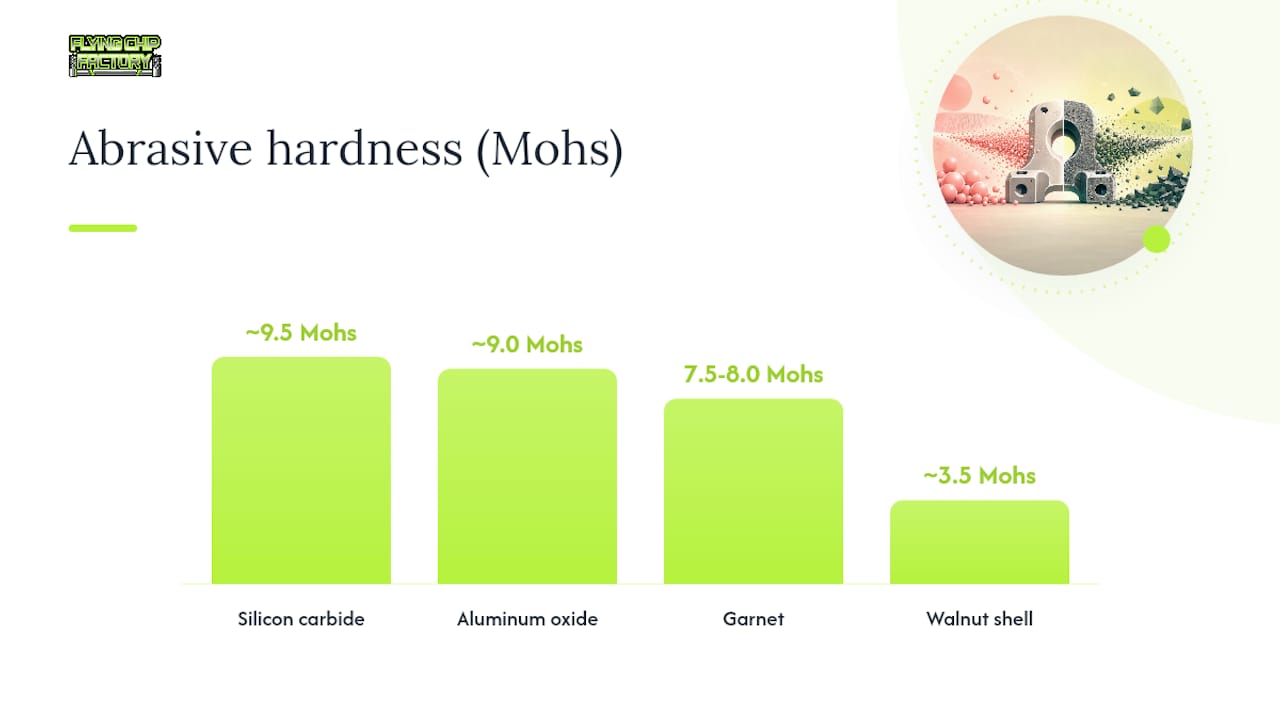
- Aluminum oxide (brown corundum): Mohs ~9.0, angular, aggressive, excellent for steel and hard alloys. The workhorse of cabinet blasting.
- Silicon carbide: Mohs ~9.5, the hardest common blasting media, used when aluminum oxide isn't cutting fast enough or on very hard surfaces.
- Garnet: Mohs ~7.5–8.0, angular but produces less dust than aluminum oxide. A popular choice for stainless and aluminum where contamination risk is a concern.
- Soda (sodium bicarbonate): soft, friable, single-use. Strips paint and coatings without profiling the substrate — useful on thin panels or chrome.
- Walnut shell: Mohs ~3.5, the gentlest angular option. Cleans without scratching soft metals or composites.
Typical PSI for aggressive grit blasting runs 60–120 PSI, with higher pressures used on heavy mill scale or thick rust. The anchor profile depth produced by sandblasting varies depending on media, pressure, and standoff distance and is sufficient for coating adhesion. Media properties including Mohs hardness, shape, and grain size determine aggressiveness — which is why swapping from a Mohs 6 glass bead to a Mohs 9 aluminum oxide at the same pressure produces a completely different surface.
How do the main blasting media compare side by side?
The table below maps the most common media across the dimensions that matter for job planning. A comparison chart shows tradeoffs across media including hardness, profile depth, reuse cycles, and dust level, helping match media to substrate and project constraints.
Mohs hardness and typical reuse cycles at a glance:
What finishes do these processes produce, and where are they used?
The visual and functional difference between a bead-blasted and a grit-blasted surface is obvious the moment you hold both parts. Bead blasting produces a uniform matte-satin surface with a slight sheen — consistent, clean, and cosmetically neutral. Grit blasting leaves a visibly rougher, etched texture with a directional or random anchor profile that scatters light and looks industrial.
Bead blasting use cases:
- Anodize prep on CNC aluminum: cleans the surface uniformly and opens the grain for consistent anodize penetration without removing stock.
- Aerospace and medical device finishing: produces the clean, non-reflective surface required by many aerospace and FDA-regulated part specs.
- Consumer product cosmetics: motorcycle parts, firearm components, and camera bodies often get a glass bead finish for the clean matte look.
- Deburring light edges: low-pressure bead blasting knocks off fine burrs on machined aluminum without rounding critical features.
- Shot peening for fatigue life: higher-intensity bead or ceramic bead blasting induces compressive stress in aluminum and titanium to extend fatigue life.
Sand/grit blasting use cases:
- Rust and mill scale removal from structural steel: aluminum oxide or garnet at 80–100 PSI strips heavy oxidation fast.
- Powder coat and epoxy prep: the anchor profile created by angular media is what gives coatings mechanical adhesion. Most powder coat specs call for a 1.5–3 mil profile.
- Weld scale and spatter cleanup on fabricated weldments: grit blasting removes heat-affected scale that wire brushing can't reach.
- Paint stripping on automotive panels: soda blasting or walnut shell for thin panels; aluminum oxide for thicker structural sections.
The Ra values tell the story numerically: bead blasting typically produces Ra ~0.8–1.6 µm, while grit blasting can push Ra to 3.0 µm and beyond depending on media and pressure.
Which substrates can each method damage, and how do you manage the risk?
Substrate compatibility is where most blasting mistakes happen. Choosing the wrong media or pressure for a given material doesn't just produce a bad finish — it can scrap a part that took hours to machine.
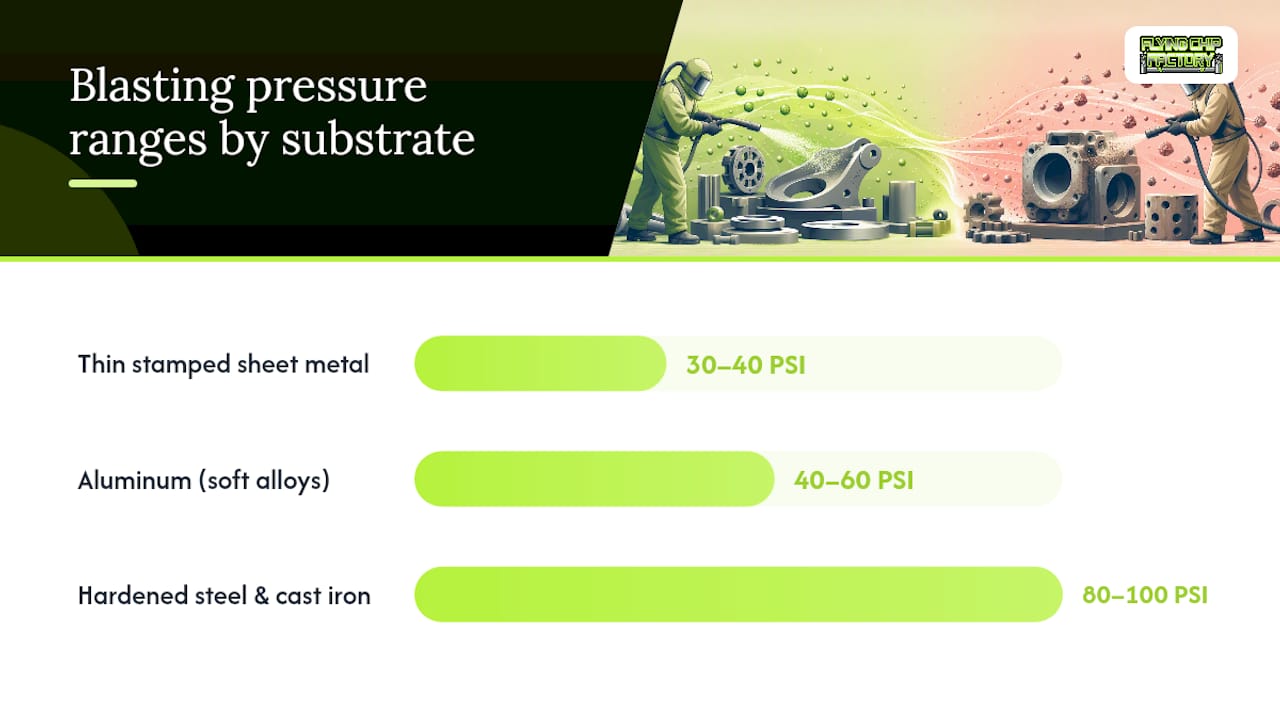
Aluminum and soft alloys: Glass bead at 40–60 PSI is the safe zone. Aluminum oxide at high pressure will remove measurable stock from a machined surface and can warp thin sections. Using the wrong blasting method on precision machined parts can ruin tolerances or cause coating failures — on aluminum housings with threaded inserts or close-tolerance bores, that's a scrapped part. For T6 and T6511 aluminum alloys, keep pressure conservative and always run a test coupon first.
Stainless steel: Fine, non-iron-bearing media such as glass bead are preferred for stainless to avoid embedded ferrous contamination and to preserve corrosion resistance. Steel shot is a contamination risk on stainless — iron particles embed in the surface and cause rust spots that look like the stainless itself is corroding. Garnet is a solid alternative when you need more cut than glass bead provides.
Hardened steel and cast iron: These tolerate aggressive media well. Aluminum oxide or silicon carbide at 80–100 PSI is appropriate for rust removal and coating prep. Cast iron is porous, so media can lodge in surface voids — blow off thoroughly after blasting.
Thin stamped sheet metal: Any aggressive media at high pressure risks oil-canning (permanent warping from uneven compressive stress). Soda blasting or plastic media at low pressure is the safer path. If you must use glass bead, reduce pressure to 30–40 PSI and keep the nozzle moving.
Practical risk mitigation:
- Mask all threads, press fits, dowel holes, and tolerance-critical bores before any blasting. Mark them explicitly on the drawing.
- Run a test coupon from the same material and heat lot before committing a production part.
- Specify standoff distance and nozzle angle on the work order — both affect how aggressively the media hits.
Pro Tip: For any part with tapped holes or threaded features, plug them with rubber plugs or tape before blasting. Grit in a thread is nearly impossible to clean out completely and will cause assembly failures.
What PSI, CFM, and throughput should you plan for?
Operating settings vary by media, nozzle size, and cabinet type, but the ranges below cover most shop scenarios.
That masking labor is the number most buyers don't account for when comparing quotes.
Key cost and productivity factors:
- Masking complexity is the biggest variable in per-part cost. A simple flat plate costs almost nothing to mask; a machined housing with 12 threaded holes and two precision bores can take longer to mask than to blast.
- Media reuse directly affects cost per part. Aluminum oxide and glass bead recycle well in a closed cabinet. Soda and walnut shell are single-use or low-cycle, so media cost per part is higher.
- Field blasting (open-air) versus cabinet work changes the equation on containment and cleanup labor.
- For high-volume production, wheel-blast with steel shot or grit often beats pressure-blast economics on straight throughput.
Can you run bead and grit media on the same equipment?
Physically, yes. A pressure cabinet or pressure pot can run either media. Practically, switching without a full purge is how you ruin parts.
Leftover angular grit in a cabinet that's supposed to be running glass bead will destroy the satin finish on the next part. Even a small amount of aluminum oxide mixed into glass bead changes the surface from a uniform peen to a randomly etched mess. Shops report needing to fully clean hoppers, lines, and cabinets when switching media to avoid contamination and ruined finishes.
The contamination risk runs the other direction too. Cabinets used for carbon steel parts carry ferrous particles. Run stainless through that cabinet without cleaning it first and you'll embed iron in the stainless surface — the same problem described in the substrate section above.
Switching media: step-by-step checklist:
- Drain the hopper completely and collect all residual media.
- Vacuum or blow out the hopper, lines, and cabinet interior thoroughly.
- Inspect and replace hoses and the nozzle if the previous media was significantly harder or coarser.
- Load the new media and run a short purge cycle to clear any remaining residue from the lines.
- Blast a test coupon from scrap material and inspect the finish before running production parts.
- Document the switch in your job log — contamination issues are easier to trace when you have a record.
Dedicated cabinets for each media type are the cleaner solution when volume justifies it. Many shops run one cabinet for glass bead and a separate one for aluminum oxide, which eliminates the switching risk entirely.
What are the health, safety, and regulatory requirements for blasting?
The biggest regulatory issue in blasting is respirable crystalline silica. Many media alternatives to silica sand are silica-free and safer under OSHA rules, including aluminum oxide, glass bead, garnet, silicon carbide, steel shot/grit, plastic media, and walnut shell; silica sand is restricted for blasting due to silicosis risk. OSHA's respirable crystalline silica standard (29 CFR 1910.1053) sets a permissible exposure limit of 50 µg/m³ as an 8-hour TWA — a threshold that open-air silica sand blasting routinely exceeds without strict engineering controls. The practical answer for most shops is to stop using silica sand entirely and switch to one of the silica-free alternatives listed above.
PPE and engineering controls checklist:
- Respiratory protection: supplied-air respirator (Type CE abrasive blasting respirator) for open blasting; at minimum a P100 half-mask for cabinet work with any dusty media.
- Hearing protection: blasting cabinets and pressure pots generate 90–100 dB at the operator position. Earplugs or earmuffs rated NRR 25+ are appropriate.
- Eye and face protection: full-face shield plus safety glasses for any open blasting; cabinet windows must be intact and polycarbonate-rated.
- Protective clothing: blast suit or heavy coveralls, leather gloves, and steel-toed boots for open blasting.
- Engineering controls: enclosed blast cabinets with dust collectors, ventilated blast rooms with negative pressure, and wet blasting systems all reduce airborne dust significantly.
Disposal notes: Spent media contaminated with lead paint, chromate coatings, or heavy metals is a hazardous waste under EPA regulations and requires licensed disposal. Glass bead and aluminum oxide from clean steel or aluminum work are generally non-hazardous but check your local jurisdiction. Soda blast media is water-soluble and typically the easiest to dispose of.
How do you decide which process is right for your part?
Work through these questions in order. The first answer that eliminates a method is your answer.
Decision checklist:
- What's the primary goal? Cosmetic finish or anodize prep → bead blast. Rust/scale removal or coating adhesion → grit blast.
- What's the substrate? Aluminum or soft alloy → bead blast or soda/walnut shell. Carbon steel → aluminum oxide or garnet. Stainless → glass bead or garnet only.
- Are there tight tolerances? Any feature tighter than ±0.002 in. → bead blast only, with masking on critical surfaces.
- What does the coating spec require? If the spec calls for a specific anchor profile (e.g., 1.5–3 mil for powder coat), grit blasting is required. If the spec calls for a clean, uniform surface for anodize, bead blasting is required.
- Is the part thin or prone to warping? Thin sheet or complex formed parts → reduce pressure, use soft media, run a test coupon.
- Is contamination a risk? Stainless or aluminum going through a cabinet that's run carbon steel → verify the cabinet is clean or use a dedicated cabinet.
- What's the budget and timeline? Grit blasting is faster per square foot. Bead blasting costs more per part when masking is complex.
Questions to ask your blasting shop:
- What media and mesh size do you use for this application?
- What PSI and standoff distance do you run?
- Is this a dedicated cabinet or shared with other media?
- Do you offer test coupons before production runs?
- How do you handle masking — do you need marked drawings?
When to run a test coupon: always, on the first part of a new job, a new material, or a new finish spec. Measure surface roughness (Ra), check fit on any mating features, and inspect cosmetically before releasing the run.
How Flying Chip Factory approaches blasting decisions for CNC parts
At Flying Chip Factory, blasting decisions start at the drawing stage, not after the part comes off the machine. The finish spec, tolerance callouts, and coating requirements all feed into how a part gets fixtured, masked, and handed off.
Machinist checklist for blasting prep:
- Mark all tolerance-critical features on the print: bores, threads, press fits, dowel holes, and any surface with a flatness or parallelism callout.
- Specify masking requirements explicitly — rubber plugs for threads, tape for precision bores, custom fixtures for complex geometry.
- Call out the required finish (Ra value or finish designation) and the coating spec on the drawing, not just in an email.
- Include a test coupon from the same material and heat lot for any new finish spec.
For CNC-machined aluminum housings and exposed cosmetic parts, glass bead at 40–60 PSI is the standard starting point. It cleans the surface, produces a consistent satin finish, and doesn't touch the tolerances. For hardcoat anodize prep, the surface needs to be uniform and free of machining marks — bead blasting handles that without the dimensional risk that grit blasting carries.
For fabricated weldments or structural steel parts going to powder coat, aluminum oxide grit blasting at 80–100 PSI gives the anchor profile the coating needs and cleans the weld scale that a wire wheel leaves behind. These parts don't have tight tolerances on blasted surfaces, so the aggressive cut is an advantage, not a risk.
Pro Tip: Send a marked-up PDF of your drawing with every blasting order. Circle the features that need masking in red and note the required finish. That one step eliminates most rework conversations and keeps your parts on schedule.
Masking and fixture work often represent a large portion of total job labor for precision bead finishes — clear drawings cut that cost directly. Flying Chip Factory's direct-to-machinist communication means finish questions get answered before a part is blasted, not after it's scrapped.
The process choice that actually matters
Most blasting decisions aren't hard once you know the substrate and the end use. The mistake shops make is treating blasting as an afterthought — something that happens after machining without any coordination with the machinist who made the part.
Tolerance and coating spec should drive the media choice. If you don't know the anchor profile your coating requires, find out before you blast. If you don't know whether your cabinet has been cleaned since the last carbon steel run, don't put stainless in it. And if you're sending a precision CNC part out for finishing, send a marked drawing with it — not just a verbal description.
Flying Chip Factory can quote both precision bead finishing for CNC aluminum parts and aggressive prep work for fabricated steel. The shop's direct-to-machinist model means the person quoting your part is the same person who understands why the tolerance on that bore matters.
Sources
- Bead Blasting vs Sand Blasting: Cost, Strength, and When to Use Each | MFG Calcs
- Sandblasting media comparison guide
- Specifying bead and shot blasted stainless steel finishes and their applications – British Stainless Steel Association
- Blasting Media Comparison Chart: All Types Ranked by Key Properties – Sandblasting Material Manufacturer
- Sandblasting vs Bead Blasting: Finish, Cost & Tolerances